Posted on

Les crêpes de lavande

Lavender crêpes for the non-French speakers among you. These are a wonderful treat for a special breakfast or brunch. Perfect on a holiday weekend, or whenever you need a treat.

Recipe enough for one or two people, just expand proportionally to serve more.

1 egg
1 cup milk
1/3 cup all purpose flour
1/4 tsp ground lavender
dash of salt

Two recommendations from friend “El Hefe de Cocina”:

Sift the dry ingredients together to be sure they are well blended and there are no clumps of lavender.

El Jefe says some of you will want to use a non-stick pan. While most cooks use them these, days I prefer the highly polished stainless pans which, once they have been used with oil a few times, are almost as non-stick as the coated ones. in any case, use a pan that doesn’t stick (and use wooden or plastic utensils if you do.)

ingredients
beaten egg and milk with 1/3 C flour on the side
scooping to cook
Ingredients all well mixed, scoop with 1/3 C measure to make first crepe.
Pour into pan
While holding the pan, pour in batter, then swirl by tipping the pan around to let gravity fill around the edges.
turning it over
Carefully slip a narrow spatula under the crepe and then turn it to cook on the other side.
flipped crepe
Cooking briefly on the other side.
on plate with jam
Flip your crepe onto a plate, then put in whatever looks good to you. Here we've put on some of our strawberry lavender jam.
wrapped
We added some homemade yogurt and then folded it and are ready to eat. You can put more yummy sauces on top, too, if you like.
Posted on

Lavender Baklava

Lavender Baklava
Lavender Baklava
Lavender Baklava

Toni Grove, our resident herbalist and nursery worker, came to work with her FAMOUS Baklava for a goodbye party for our longtime staff member Nancy. She made it with lavender!! It was fabulous!

Recipe

Filling

4 C Finely Ground Walnuts
1/3 C Sugar
1/4 tsp Cinnamon
1/4 C finely ground lavender
1/2 Lb. melted butter

1 pkg filo dough

Syrup

1 C sugar
1 C water
1/4 C honey
1/4 tsp Cinnamon (optional)

Assembling

Preheat oven to 350º

Lay the filo dough leaves in the bottom of a lasagna pan, buttering (use basting brush dipped in melted butter) every other leaf until you have a layer of about 6 or 8 leaves. Mix together the ground walnuts, 1/3 C sugar and 1/4 tsp cinnamon. Spread 1/3  of the mixture evenly over the filo layer. Lay two more filo leaves over the filling you just put on and butter the top filo layer. Spread 1/3 more of the filling, spread evenly, and another layer of two filo leaves with butter on top. Spread final third of mixture and top with the remaining filo leaves, buttering every other one.

Bake for 45 minutes

Take out of oven, or turn off oven and let it cool in the oven.

When cool, slice in your desired shapes. You’ll now need to make the syrup. Heat in microwave for two minutes on high: one cup sugar, one cup water, and 1/4 honey. Stir well until everything is dissolved. Pour over your nicely cut baklava.


Posted on

Candied Ginger with Lavender

Watch us create Candied Ginger with Lavender step by step. We’re starting tonight on Jan 12, 2012. We’ve cut up about three big chunks of fresh ginger, made a sugar syrup of 1 1/2 cups of sugar and 3 cups of water, and added 1/2 lemon sliced up and about 2 tablespoons of our culinary lavender.

Candying Ginger early on
Ingredients starting to cook

We are now boiling it gently and will continue to do that for a long time…  I wish I could pass the smell through the internet, it’s absolutely divine as the pot is simmering the ginger, lemon, and lavender are swirling, and dancing through the room.

It’s been simmering for about an hour and a half now. You can see in the second photo that the color is changing and the ginger is looking softer.

Candying Ginger 1.5hrs along

It takes 4 to 6 hours to fully cook ginger, the first few hours are pretty easy, you can just cover and let it simmer away (checking once in a while).

Ginger after about 4 hours of cooking

Towards the end of the cooing, though, you’ll need to check more often because the syrup gets thicker and the potential to burn increases. See how the color of the ginger gets a bit more golden brown as the cooking time increases. These pieces of ginger are almost done – the look almost translucent in the pot.

Candied ginger first time on drying rack

At this stage I took it out of the syrup and placed each piece on a drying rack that is part of the home dehydrator. Because I was cooking with lavender I took some time to scrape off the bits of lavender. It’s a bit of a bother, but it’s worth it to avoid biting into a chunk of lavender that distracts from the excellent blend that lavender will give to the candied ginger when finished.

Straining the ginger syrup

Now, you might just throw away the syrup that’s left in the pan after taking out all these beautiful pieces. Don’t do it! Strain out the syrup and save it for drizzling on… well, lots of things. How about on ice cream? Stir it into yogurt. Make a sweet/sour chicken dish. Use it as a sweetener for a great sugar cookie.

Now you are going to let the dehydrator do it’s work for at least 8 to 10 hours. You don’t want to let it go too far, because you’ll want the pieces to still be sticky so the granulated sugar that you’re going to put on will stay on the pieces.

Still sticky ginger pieces in sugar

I carefully placed each piece on a plate of sugar and then turned it to cover both sides. Then I threw the pieces into a container that had sugar in it, put the cover on, and shook it vigorously.

Ginger in container for sugar shaking

If I had put it in the container without covering both sides with sugar first, they would have wadded together and been harder to shake to cover. As it is, they stuck to each other a litte.


Sugared ginger pieces

Then I pulled them apart and placed them back on the dehydrator tray for another session of drying.

We sampled them after about 5 hours of drying to see how they tasted and what the texture was like. They were still too squishy and needed more time in the dehyrator. But, we still had to taste them and, wow, they were fabulous. The pieces had more “heat” than the store bought variety, and the lavender added a subtle shift in flavor that was truly delicious. There were four tasters and we didn’t all agree on how much of the lavender we could taste, and that’s a good sign that it’s about right. You don’t want too much lavender because the main flavor needs to be the ginger. Lavender is a helper flavor and shouldn’t shout out its presence.

The ginger was dried for another day and was about perfect. I dipped about half of the pieces in couverture dipping chocolate and they were stunning. I’m sorry, we ate them before we could take the final pictures.


Posted on

Sage, Lemon & Lavender Ice Cream

This makes a divine ice cream that will keep people talking for a long time.

Combine the cream, sage, lemon, and whole lavender into the cream over low heat for about 15 to 20 minutes. Don’t let the cream stick to the bottom or skim on the top – so keep stirring.

When done infusing, strain the herbs and lemon out of the cream.

Add the milk and sugar and chill.

Using an automatic ice cream maker – pour all the chilled ingredients into the ice cream maker’s bowl and process until it’s as firm as you want it.

Transfer the ice cream into containers and put in your freezer for a few hours to get a bit harder.

Posted on

Tourtiére with Lavender

Piece of Tourtiere
Piece of Tourtiére Pie

Ingredients – Filling

  • 1 pound lean ground goat (can substitute beef or mixture of beef & pork)
  • 2 tablespoons olive oil
  • 1 large onion, diced
  • 3 cloves garlic, minced
  • 1 1/2 teaspoons salt
  • 1 teaspoon dried lavender
  • 1/4 teaspoon ground sage (or 6 leaves fresh sage – chopped)
  • ¼ cup fresh parsley chopped
  • 1/4 teaspoon ground black pepper
  • 1/2 teaspoon ground allspice
  • 1 1/2 cup mashed potatoes
  • 1 cup chopped carrots
  • ½ cup peas

Ingredients – Pie Crust

If you have a favorite recipe for pie crust for a 9” pie – go for it. Otherwise here’s mine:

  • 1 ⅓ sticks of salted butter
  • 2 cups all purpose flour
  • 1 tsp salt
  • around 6 tablespoons ice cold water (put water in a cup and float ice cubes in it until you’re ready to use it)

Directions

In a saucepan, combine olive oil, onions & garlic. Saute until they are starting to turn a little brown. You want just a little caramelization. Remove from pan and hold in a good sized bowl (you’ll be adding more later).
In the pan put in the ground meat and cook over medium heat until all the meat is gently cooked. When done, add to the bowl of onions and garlic.
Into the bowl add all the herbs and spices, as well as the peas, carrots, and mashed potatoes. Stir really well, so the potatoes are mixed in and hardly visible.
At this point you can refrigerate the mixture until you are ready to make the pie.

Make the pie crust

Preheat oven to 395 degrees F (200 degrees C).
The easy way: using a food processor, but the flour and salt into the food processor. Cut the butter into pats of about 1 tablespoon each and put in with the flour. Pulse the food processor a couple of times until the butter has been cut into bits – but don’t run it too much or it will be too finely chopped and you’ll sacrifice fluffiness of your crust. Then add about 5 or 6 tablespoons of water and pulse it again. You’re looking for the mixture to make larger beads than with just the butter. Don’t let it clump up into a ball but add water so it will make those beads. Then scoop about ⅔ of it out of the processing bowl, form it into a ball with your hands, and roll out the bottom crust. Put it in the pie pan, add the meat mixture. Then roll out the rest of the pie crust dough. Place top crust on top of pie and pinch edges to seal. Cut slits in top crust so steam can escape.
Bake in preheated oven for 45 minutes, check to see how it looks, and keep going until the crust is golden brown and there is a little brown on the bottom crust (if you can see it – we cook in glass pans). Let cool 10 minutes before slicing.

Serving it

It’s good to have some chutney, or Milepost 19’s Raspberry Mustard, yogurt, or other kinds of sweet things for people to use to dress it up at the table.

Bon Appétit!

Posted on

Chicken with Balsamic Lavender Marinade

You don’t think of lavender being a savory dish flavor, but it works really well!

2 Chicken breasts

1/2 C Soy Sauce

2/3 C Olive Oil

2 Tbl Mirin (Rice wine)

1/3 C Balsamic Vinegar

1/4 C Brown Sugar

2 Tbl finely chopped onion

2 tsp Culinary Lavender

Mix all but the chicken breasts for the marinade. Wash and pat dry the chicken breasts and put in glass pan and cover with the marinade. Let it sit in the refrigerator for at least an hour, up to 4 hours – turning the chicken from time to time.

Bake in 350 oven until done (you can text by sticking a fork into the chicken and if no juices come out it’s quite done).

Serve with potatoes or pasta

Posted on 2 Comments

Roasted Lavender & Sage Fried Potatoes

Out of eggs this morning, so I wandered out to the garden to gather some spuds, onions, garlic & herbs for a mess of fried potatoes for breakfast. Pan-roasted lavender is the newest ingredient in my list and I wanted to experiment with it.

First you’ll have to learn how to pan-roast lavender.

DIGITAL CAMERA

Start with an empty pan – no oil, no butter, nothing.

Heat the pan up to medium high, not too hot or you’ll burn the lavender. Add the lavender and stir it constantly. You’ll see the oils steaming away. This will remove some of the sweeter, floral scent of the lavender and leave you with a rich, nutty lavender to use in your savory dishes.

Essential Oil steaming away
Roasted lavender on left, our regular culinary lavender on right

You can see how the color has changed after the lavender has been roasted. After roasting the lavender we grind it up to let the flavor diffuse better into the potatoes. I don’t like biting into a whole bud of lavender, it tends to be too intense and overwhelms the flavor of the dish.

Now you are ready to start with the rest of the ingredients.

Three kinds of potatoes and our onions make it colorful

We used three different kinds of potatoes that we grow: Yellow Finn, Pink Fingerling, and Blue. We grow our own onions and garlic, too. That’s why I said I went out and gathered all those ingredients for breakfast.

Bergaarten Sage
Curly Leaf Parsley

I gathered other herbs for this dish: sage, parsley and then garlic. All are chopped or sliced to add to the potatoes.

Chopped Sage
Sliced Garlic

Throw them in the pan with some salt and cook until some of the surfaces of the potatoes are brown. Serve with eggs and you have a fabulous herbal breakfast.

Ingredients:

1/4 C Olive Oil
6 potatoes
3 cloves of garlic
1 big or two medium onions
2 tsp ground roasted lavender
1 Tbsp fresh chopped sage
1 Tbsp fresh chopped parsley
Salt to taste

Potatoes ready to eat!
Posted on Leave a comment

Jam Recipes

Blueberry Jam
One of our jams

We make jams with lavender.  They are really really good, and people buy them a lot. But, I want to let you know how we do it….

Here’s my secret… you can take your favorite recipe (that makes about 8 seven ounce jars) and add about a tablespoon of ground culinary lavender and make a great jam.

That’s it, simple and yet makes a delicious jam that you will love. Now that we’re going into berry and fruit season you can experiment to your heart’s content with the bounty in your area.

Need culinary lavender? (We have some, of course.) If you have lavender in your garden, just follow these basic rules. Don’t eat Lavendula Stoechas (what a lot of people call Spanish lavender), or most of the Lavendula x-intermedias (the hybrids that have nice long stems, there really isn’t a country’s name that refers reliably to these). You can eat most of the Lavendula Angustifolia varieties – with Hidcote, Munstead, and Melissa being among the best. You can eat one hybrid variety called “Provence”. If you stick to that you’ll be perfectly safe and your jams will be that much more delicious.

Come back to this post and comment to let me know how you did.  Bon Appetit!

Posted on 3 Comments

Necessity and invention – No more stink!

I was to supply the lemonade, paper plates, plasticware, and wine glasses at the community dinner last night. I stopped at the local grocery store to get a couple more cans of frozen lemonade and while I was there I picked up some sorely needed underarm deodorant. Did I mention this is going to be a personal blog post? Well, it won’t end up that way, but it starts out….

Tom’s of Maine Lavendar (which they spell wrong) or Calendula deodorants have been my favorite for a while, so I bought one and into the plastic bag it went, along with the lemonade. I got to the dinner, forgot about what was in the bag and handed it off to a woman who seemed eager to have the lemonade. On the way home I remembered. Uh oh, it was going to be a stinky day tomorrow.

Wait a minute! I have a lavender farm and we make lots of cool products, and have even been thinking in the background about making a deodorant. So, onto the web I go and I find a couple of really cute videos of younger-than-me women telling how to make a deodorant. One was Mochamoments and she cracked me up – so calm talking about such a personal thing! I actually didn’t use her recipe for the deodorant, but I did use her attitude-recipe for being cool with it and having fun.

Want to know my recipe?

1 1/2 TBL beeswax pastilles
1/2 TBL Shea Butter
1 TBL Coconut Oil
10 drops Bergamot Essential Oil
15 drops Rosemary Essential Oil
25 drops Lavender essential Oil
3 drops Castor Oil

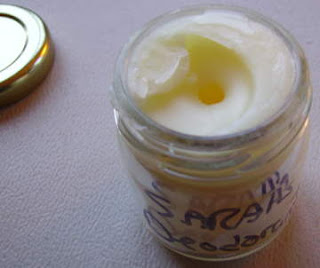
I melted the first three ingredients in a small sauce pan, then added the rest of the ingredients. Poured them into a mini jam jar (because that is what I had on hand) and capped it to cool. Meanwhile, I scraped the stuff left in the pan with my finger and covered my armpits with the stuff. It smelled wonderful! Nancy, who works here with me, was making fun of me because I’d tuck my nose into the neck of my shirt and sniff every 10 minutes or so. 10 hours later after hard labor on the farm – guess what! I don’t stink!

Make your own deodorant, it’s fun and much more healthy for you. This concoction that I made won’t last forever, because there are no real preservatives in it, but it will last long enough, I’m sure.

Some factoids:
The essential oils included are good because: They all smell wonderful and all three help with antimicrobial effects. Bergamot can have issues with photosensitivity, but hey, here it’s under the arm, where the sun don’t shine.

Castor Oil is an amazing oil, used for things like airplanes, skin conditioner, anti-depressant (Wikipedia: Castor oil and its derivatives have applications in the manufacturing of soaps, lubricants, hydraulic and brake fluids, paints, dyes, coatings, inks, cold resistant plastics, waxes and polishes, nylon, pharmaceuticals and perfumes.) Who knew?

Coconut Oil is used a lot in soaps and lotions because it’s solid at room temperature, and has other cool qualities such as skin moisturizer and softener. Shea butter is also a moisturizer, but it also helps with scars, burns, rashes, etc. And beeswax is just wonderful – it smells good, is hard enough to make the deodorant “paste” viable as a paste. It protects things and adds moisturizing effects, too.

I’ll be making more deodorants, with other ingredients. This is so much fun! Add your comments if you’ve made your own deodorant, or not. Seems to me we can reclaim our own ability to smell wonderful! And, oh, by the way, Go Lavender!!

Posted on 1 Comment

Lavender tooth powder

I got curious about making a tooth brushing powder with some lavender, of course. I read up on some ingredients and then tried my first batch.

1/8 C Baking soda (neutralization and scrubbies)
2 drops peppermint essential oil (flavor and a whole host of benefits)
2 drops lavender essential oil (anti-microbial)
1/8 tsp of Equal sweetener (Aspartame, while somewhat questionable for health is powdered, but glyercine would make a paste and sweeten it – depends on what you want)

It didn’t taste all that good, but after brushing with it my mouth feels really fresh and clean. Let me know if you try anything like this, and we’ll all get some great ideas for DIY lavender tooth paste/powder recipes.

Update (4/27/2015): Looking back at this we can’t recommend the recipe because there is probably too much essential oil in it. Use extracts rather than essential oil (Peppermint & Lavender extracts) and use Vegetable glycerine rather than artificial sweetener. That way you are using ingredients that are clearly safe.